Introduction
A mail server (sometimes also referred to an e-mail server) is a server that handles and delivers e-mail over a network, usually over the Internet. A mail server can receive emails from client computers and deliver them to other mail servers. A mail server can also deliver emails to client computers. A client computer is normally the computer where you read your emails, for example your computer at home or in your office. Also an advanced mobile phone or Smartphone, with email capabilities, can be regarded as a client computer in these circumstances.
- OS: Ubuntu 20.04
- IP Address: 167.172.147.65
- Hostname: mail.akashspot.gq
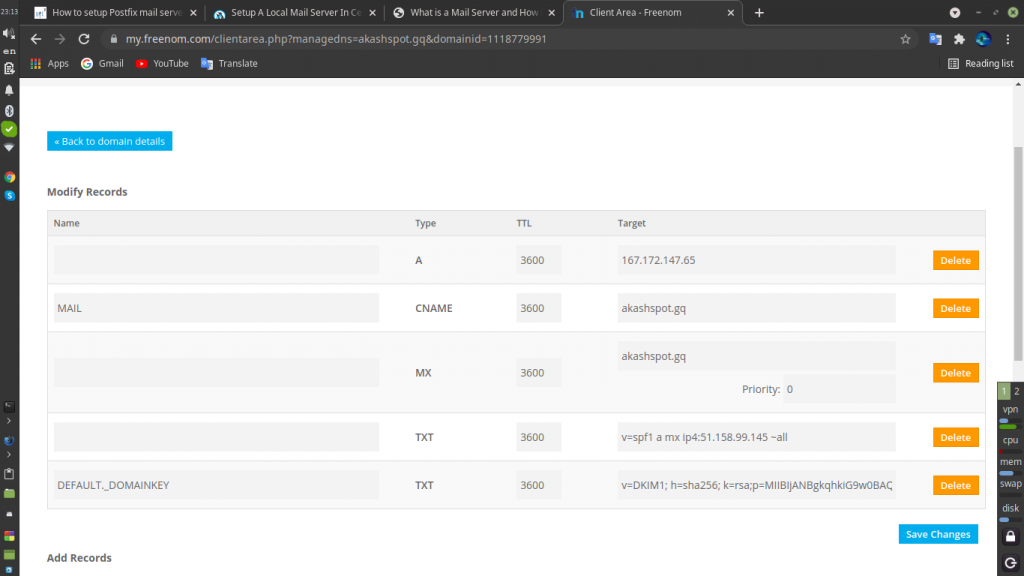
1.Setup DNS server and add the Mail server MX records in the forward and reverse zone files.
2. Add hostname entries in /etc/hosts file as shown below:
# vi /etc/hosts
Add your FQDN:
167.172.147.65 mail.akashspot.gq mail
3.Add mailname in /etc/mailname file as shown below:
# vi /etc/mailname
Add your mailname
4.disabled SELinux to reduce the complexity in postfix configuration.
To do that, edit: vi /etc/sysconfig/selinux
Change SELINUX=enforcing to SELINUX=disabled.
5.Install Postfix
Postfix is a free open source mail transfer agent (MTA). It is fast, secure and easy to administer.
Now, install Postifix using command:
# apt-get install postfix
- Configure postfix
Edit /etc/postfix/main.cf file:
# vi /etc/postfix/main.cf
Find and edit the following lines:
Smtpd_banner = $myhostname ESMTP $mail_name ($mail_version)
biff = no
append_dot_mydomain = no
readme_directory = no
mailbox_size_limit = 0
recipient_delimiter = + .
inet_interfaces = all
inet_protocols = ipv4
alias_maps = hash:/etc/aliases
alias_database = hash:/etc/aliases
myhostname = mail.akashspot.gq
myorigin = /etc/mailname
mydestination = $myhostname, akashspot.gq, localhost.akashspot.gq, localhost
mynetworks = 167.172.147.0/24 127.0.0.0/8
Save and exit the file.
Start/restart Postfix service now:
# systemctl enable postfix
# systemctl restart postfix
6.Install Dovecot
Dovecot is an open source IMAP and POP3 mail server for Unix/Linux systems.
To install it, run:
# apt-get install dovecot-core dovecot-pop3d dovecot-imapd
- Configuring Dovecot
Edit file /etc/dovecot/dovecot.conf file,
# vi /etc/dovecot/dovecot.conf
listen = *
Save and exit the file.
Edit file /etc/dovecot/conf.d/10-auth.conf file,
# vi /etc/dovecot/conf.d/10-auth.conf
disable_plaintext_auth = no
auth_mechanisms = plain login
Save and exit the file.
Edit file /etc/dovecot/conf.d/10-mail.conf file,
# vi /etc/dovecot/conf.d/10-mail.conf
mail_location = mbox:~/mail:INBOX=/var/spool/mail/%u
mail_privileged_group = mail
Save and exit the file.
Start/restart Dovecot service now:
# systemctl enable dovecot
# systemctl restart dovecot
To check whether pop3 or imap ports are open,
Use the command,
# netstat -antp
7.Install Squirrelmail
SquirrelMail is a project that aims to provide both a web-based email client and a proxy server for the IMAP protocol.
Make sure that you’ve installed and enabled the EPEL repository.
Then, Install Squirrelmail using the following command:
# apt-get install squirrelmail
- Configure squirrelmail
Navigate to /usr/share/squirrelmail/config/ directory:
# cd /usr/share/squirrelmail/config/
and run the following command to configure Squirrelmail.
# ./conf.pl
The following wizard will open. Enter choice “1” to set your organization details:
SquirrelMail Configuration : Read: config.php (1.4.0)
———————————————————
Main Menu —
1. Organization Preferences
2. Server Settings
3. Folder Defaults
4. General Options
5. Themes
6. Address Books
7. Message of the Day (MOTD)
8. Plugins
9. Database
10. Languages
D. Set predefined settings for specific IMAP servers
C Turn color off
S Save data
Q Quit
Command >> 1
The following wizard will open. Enter “1” again to modify your organization details:
SquirrelMail Configuration : Read: config.php (1.4.0)
———————————————————
Organization Preferences
1. Organization Name : SquirrelMail
2. Organization Logo : ../images/sm_logo.png
3. Org. Logo Width/Height : (308/111)
4. Organization Title : SquirrelMail $version
5. Signout Page :
6. Top Frame : _top
7. Provider link : http://squirrelmail.org/
8. Provider name : SquirrelMail
R Return to Main Menu
C Turn color off
S Save data
Q Quit
Command >> 1
Set your Organization name and press Enter:
[SquirrelMail]: akashspot.gq
Similarly, set all the details such as organization title, logo, provider name in the above wizard. Once you done, press “S” to save the changes, and press “R” to return back to your main menu:
SquirrelMail Configuration : Read: config.php (1.4.0)
Organization Preferences
1. Organization Name : akashspot.gq
2. Organization Logo : ../images/sm_logo.png
3. Org. Logo Width/Height : (308/111)
4. Organization Title : SquirrelMail $version
5. Signout Page :
6. Top Frame : _top
7. Provider link : http://squirrelmail.org/
8. Provider name : akashspot.gq
R Return to Main Menu
C Turn color off
S Save data
Q Quit
Command >> S
Now, enter “2” to setup mail Server settings such as domain name and mail agent etc:
SquirrelMail Configuration : Read: config.php (1.4.0)
———————————————————
Main Menu —
1. Organization Preferences
2. Server Settings
3. Folder Defaults
4. General Options
5. Themes
6. Address Books
7. Message of the Day (MOTD)
8. Plugins
9. Database
10. Languages
D. Set predefined settings for specific IMAP servers
C Turn color off
S Save data
Q Quit
Command >> 2
Enter “1”, Enter your mail domain (ex. akashspot.gq) and press Enter key.
SquirrelMail Configuration : Read: config.php (1.4.0)
———————————————————
Server Settings
General
——-
1. Domain : localhost
2. Invert Time : false
3. Sendmail or SMTP : Sendmail
A. Update IMAP Settings : 167.172.147.65:143 (uw)
B. Change Sendmail Config : /usr/sbin/sendmail
R Return to Main Menu
C Turn color off
S Save data
Q Quit
Command >> 1
[localhost]: akashspot.gq
Enter “3” and change from sendmail to Postfix MTA (i.e. SMTP):
SquirrelMail Configuration : Read: config.php (1.4.0)
———————————————————
Server Settings
General
——-
1. Domain : akashspot.gq
2. Invert Time : false
3. Sendmail or SMTP : Sendmail
A. Update IMAP Settings : 167.172.147.65:143 (uw)
B. Change Sendmail Config : /usr/sbin/sendmail
R Return to Main Menu
C Turn color off
S Save data
Q Quit
Command >> 3
Enter “2” to switch from sendmail MTA to postfix.
You now need to choose the method that you will use for sending
messages in SquirrelMail. You can either connect to an SMTP server
or use sendmail directly.
1. Sendmail
2. SMTP
Your choice [1/2] [1]: 2
Now enter “S” followed by “Q” to save and exit Squirrelmail configuration.
11.Create a squirrelmail vhost in apache config file:
# vi /etc/apache2/sites-available/apache.conf
Add the following lines
Alias /webmail /usr/share/squirrelmail
<Directory /usr/share/squirrelmail>
Options Indexes FollowSymLinks
RewriteEngine On
AllowOverride All
DirectoryIndex index.php
Order allow,deny
Allow from all
</Directory>
Restart the Apache service:
# service restart apache2
8.Create mail users
# useradd user1
# passwd user1
# useradd user2
# passwd user2
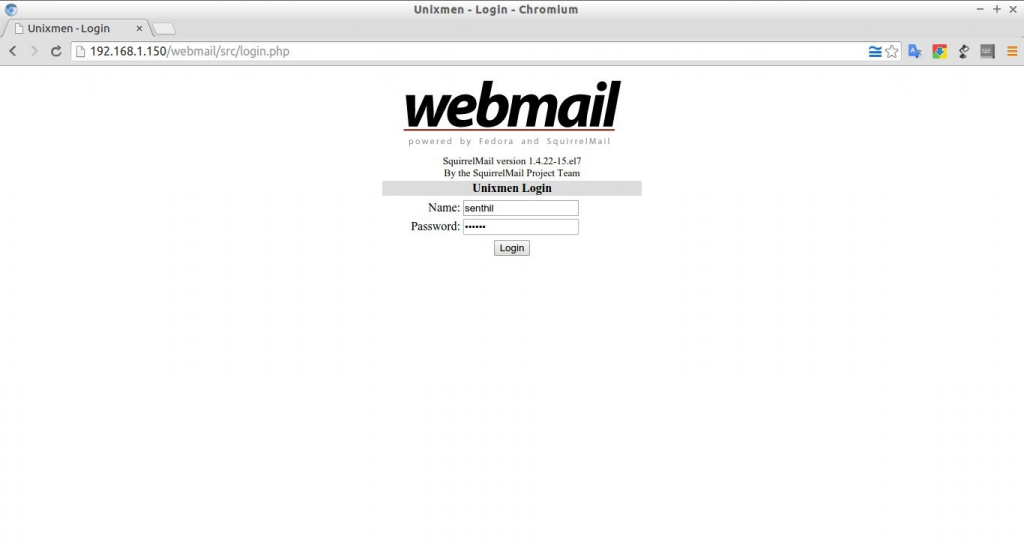
9.Access Webmail
Now navigate to http://ip-address/webmail or http://domain-name/webmail from your browser.
The following screen should appear. Enter the username and password of the user which we have created earlier.
ALL DONE!!